
Editing photos helps to reduce the file size, not only enhance its beauty Here are some tips and tutorials for photo editors. If you need to learn how to edit pictures, here are a few tips to obtain stunning images. You will take your work to a higher level. It is a post-processing work, and it is a good idea to use Adobe Camera Raw, Lightroom, and Photoshop. Professional photographers like these photo editors, so we will give you a few tips to upgrade your picture.
Speed simple process
The workflow is the main issue when editing a picture. Beginners can spend an hour editing only a few pictures. They experience a lousy time opening, editing, and saving their work, so they need to know tips and tutorials for photo editors. Adobe Camera Raw makes the process easier, offering some shortcut keys. We are talking about the popular Cmd+C (for a copy) and Cmd+V (for paste). It merely looks, but you will save time using these shortcuts.
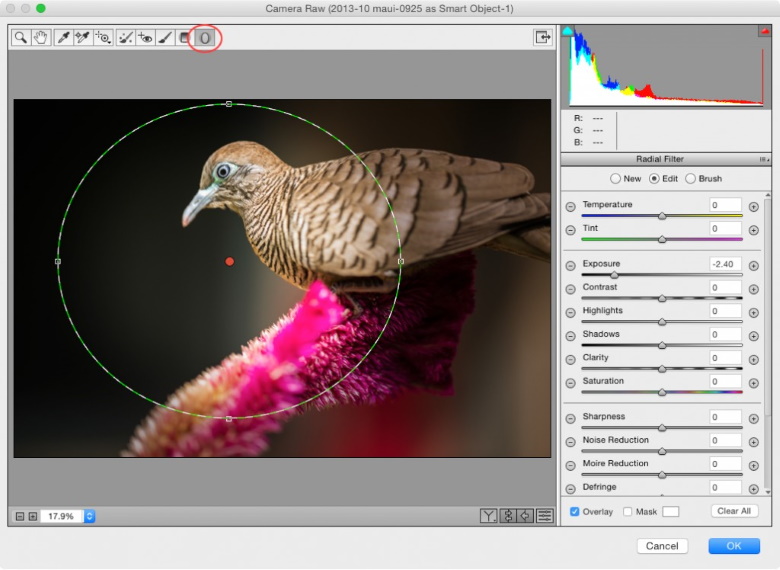
Camera raw filter
To enable the interface Camera Raw, professionals use Photoshop. You need to select a layer, then Filter -> Camera Raw Filter. To return to the Raw Camera Filter, to fine-tune your images, you need to convert the layer using a filter -> Convert for Smart Filter. You will obtain a Smart Object. The maneuver prevents destructive edits.
Improve your knowledge about lens and camera adjustments
First, you need to learn about Lightroom and ACR panels before making the adjustments. Before making changes to contrast and color, you need to check the Calibration panel. It is essential to check the Lens Correction tab and the Enable Lens Profile Correction options. When you use wide-angle lenses, some areas can be pushed out of the frame, by the automatic lens adjustment. It is wise to check these settings before you crop the picture.
Use shortcuts
It is essential to use the shortcuts; it saves time, offers an excellent command of the software. For example, holding H simplify the zooming. In Photoshop, pressing and holding H creates a zoom. To switch to the hand tool, you need to press the space bar, dragging the picture to check the details in every area.
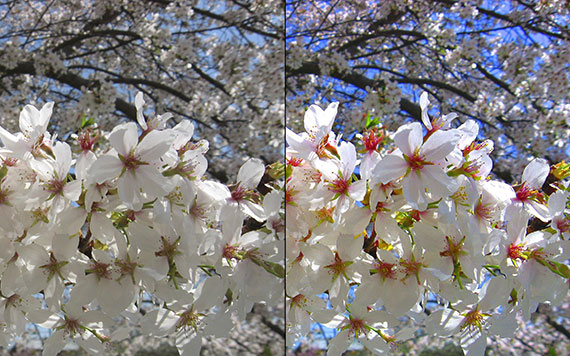
Create vivid skies
You can give a subtle boost emphasizing the contrast between a cloudy sky and a blue one. You only need to select Luminance and drag the blue sky to darken the sky. The maneuver should be used tempered, because the results may be worse than the original.
There are many different techniques to create vivid skies. You can apply a Graduated Filter, to boost the clarity. Another solution is to use Curves to increase the Saturation and Vibrance. You can use directly on the image of the Targeted Adjustment Tool. Click on the bullseye icon in the Lightroom. Click and drag on the dark areas.

Experiment with preset settings
After clicking on the Develop module, you will see the Preset panel. If you need to undo an effect, scroll down to the History palette and click back. You need to go to Lightroom Effects Presets and select Light Grain.
How to stylize photos
Follow the next steps to improve the quality of your photos. It is not difficult, please be patient and learn.
- Upload your picture in Photoshop and select the panel Brightness/Contrast
- Adjust contrast to +35, brightness to +25, and saturation to -25.
- Adjust the curve layer
- Select and drag a little the center of the red line
- Move the blue line up
- Move up a little the green bar
- Select the soft light blending mode
- In the end, select the soft light blending mode
Add two solid color adjustment layers. Add a pale yellow and set the blending mode to Overlay. Now set the opacity to 35% and apply the second color layer “f000ff” and then set the blend mode and opacity to 30%.
Use apply levels carefully
A Layer Mask accompanies adjustment layers. It is helpful when hiding parts of the tweak. Chose the brush tool and paint over tweaked parts with black, then paint white to reveal the tweak.
Cropping
Often the photo can be enhanced by cropping. Almost everyone knows how to use the crop tool. Cropping a photo involves removing parts of a picture. It is merely to do. The result can transform a great photo into a professional image. When cropping, please consider:
- Crop to improve the focus. If the subject looks small or lost within the picture, crop, it fills the frame. You will have more subjects and less background. You can zoom in on the part of the subject. In both situations, the perspective changes. You will create a clear point of attraction to your viewers.
- Crop to remove details. A picture can have wayward shadows, bits of trash, excessive background, unrelated objects, empty space, strangers, or anything else. Cropping is easy and has spectacular effects.
- Crop to change framing/orientation. If you take a photo and neglect to hold the camera in a way that focuses on the subject, you can use a vertical or horizontal crop to change the perspective and create a perfect image.
- Crop to change the aspect ratio. The aspect ration offers different qualities. Cropping for aspect ratio is crucial when someone wants to print images to fit a frame.
The rule of thirds
It is useful to respect the “rule of thirds.” It is a useful feature from tips and tutorials for photo editors.The rule of thirds is related to composition; it means superposing a 3×3 grid on top of a photo. Some cameras and photo editors have this feature. Some studies show that, when looking at an image, the eyes naturally gravitate to the intersection points of the 3×3 grids. Photo enthusiasts take pictures with subjects in the center of the image. The rule of thirds allows adjusting a crop to align the subjects along lines at intersection points.
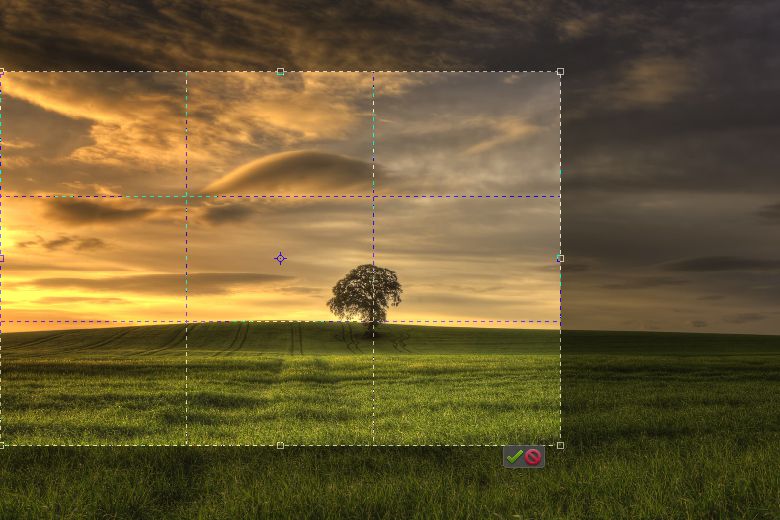
If you shoot a landscape photo, you need to crop an image, so the horizon line appears along a horizontal line.
Here we shared some tips for enthusiasts to improve their editing skills. I hope that these tips help you to obtain stunning photos.
If you want to become a great photographer using well-explained photo editor, read our site.