
What are the best photo editing websites?
The best photo editor is the one that meets your needs and/or offers more. The word ‘best’ is very subjective and people tend to use it when they are extremely satisfied with what they have been served with. For some, it can be an easy interface and for some, it can be the most complex feature.
There are 100s of websites that offers a great set of features some of which are:
- Pixlr Online
- Fotor
- PicMonkey
- BeFunky
- Picture Editor
A snippet of the websites
Pixlr Online – An easy-to-use interface with extremely useful features is how I can describe it. I am a big fan of Pixlr Online as every major edit that one can do using a full-fledged application can be done here and it’s hassle-free.
Fotor – UI is easily comprehensible, and it is pretty fast unlike some online editors that can get choppy while on use. Best suited for hobbyists and beginners as it doesn’t have extravagant features.
PicMonkey – It has a great clutter-free interface and has many templates that can help you get the job done quickly. It has a lot of features that can be unlocked with a fee of $7.99 per month or $72 per year.
Befunky – It offers a simplistic and intuitive interface. Has a lot of design elements that help in creating brochures, posters, and slides for MS PowerPoint. Bloggers and social media users would love this.
Picture editor – Very easy interface that offers all the features that are mostly required. Adding clipart and photo manipulation can be quickly and easily done without hassle. Just like all the other online editors, this can also be used on all devices as it uses native HTML5.
How to edit a JPEG image?
Applications like Adobe Photoshop, GIMP, MS Paint, and all the other applications out there can help you get the job done. All you have to do is to import the JPEG into the application and start using the tools that the app has to offer.
What does photo restoration mean?
One of the important reasons why people like to photograph a scene is to remember what they did or saw. The word restore means to bring back life into something. When we apply this logic to photo restoration it means that you will be fixing a photograph that is probably damaged in some way. This damage may include natural environmental damage such as air or dirt, the damage was done by a person such as under maintaining a photo or being affected by the passage of time thus making it duller in appearance. Essentially you will be bringing the photograph back to its former glory.
In terms of photo editing, this process is usually seen in the restoration of olden day pictures. To restore a photo you will essentially be using the editing tips you know to take away any damage that you can see or dull effects that hide the real features of the photo. This may include fixing a sub damaged image to recreating a scene that is torn up or found to be missing in some areas. Sometimes you may find that there is too much of a color that is not needed. You can also remove this excess of the wrong color and add in the right color to make things pop. Overall what you will be trying to achieve is to imagine how the picture would look in the modern day without stripping away the core beauty in it.
You can also do this to physical photographs. All you have to do it transfer it to your digital computer by scanning the image in it’s broken or damaged state. You can also try and take a photo of the photo if you have a high-quality camera in hand and then transfer the photo to your system. Then with the complex editing tools such as Adobe Photoshop, you can use it to attempt to fix the photo.
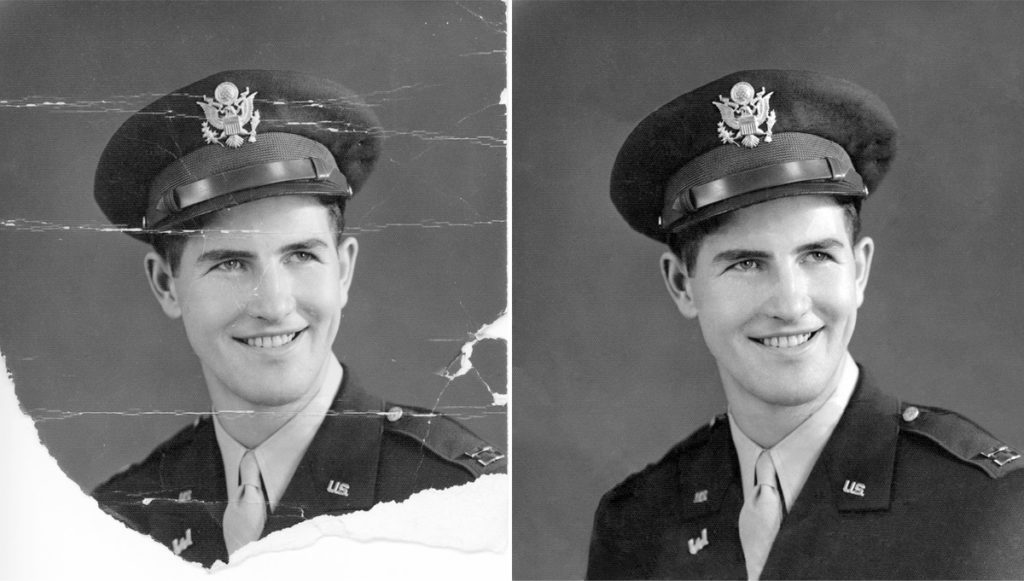
You can use the tools that are easily available online to do this yourself. For instance, Inpaint is a software that does the reproduction of old photos. To fix a photo you can start by uploading a scanned copy of the damaged photo onto the software. Use the magic wand tool to select areas of the same color or the brush tool to draw on the torn areas or other defects. The next step is to click the Erase option which will magically remove all the things that you had selected making the photo good as new.
Apps to remove something from pictures?
TouchRetouch – This app is pretty clever when you want to easily remove any unwanted objects in your photo with a brush tool that they have. Other tools they provide are the clone tool and the special selection tools. To edit your photo you must simply get your photo either by clicking it at that instant or opening one from your phone gallery. Make sure to choose the optimum resolution for the image. Use either the brush tool to select the object you want to remove with precision. You can change the properties of the brush by changing the size as well so that it is easier to go over the smaller and bigger areas as needed. You can also use the selection tool like the lasso tool and draw a rough circle around the object. This will automatically select the object you want and you can then remove it easily.
SnapSpeed – This is a slightly advanced photo editing tool and it can remove people from your images. SnapSpeed comes from Google and includes a lot of tools for you to use in your editing process. To remove any person from your photo you can bring in the photo into this app and edit it by clicking the Edit button at the bottom. Click on the heal tool next and proceed to draw over the area you want to take away. This will remove that particular portion easily. You can then proceed to save the photo.
Enlight Photofox – Another app for your iPhone which you can use to effectively edit your photos. The range of tools in this app lets you have the clone stamp tool, healing brush, and patch tool, among others, right on your mobile phone. There are also complicated features like layers differentiation, different effects, and text addition, etc. With this app you can also remove people or objects from your images. Simply select the Patch option on the mode menu. You can find this menu under the heal option which is under your tools menu. Make a patch over the area you want to take away and use the flatten button until you have the desired effect. What this tool is doing is that it is trying to blend the background and the object together until it isn’t there anymore. You can also use other options like setting a value for feathering or fuse or smoothing the but with the heal option.
PhotoShop Fix – This is an app that is from Adobe. This app can be used on your iPhone and any person who is unskilled can also edit photos with it. The app has a list of tools to make your pictures better looking. One of the things you can do is remove people. First, get your photo into the tool and use the pen tool to create a geometrical shape around the unwanted perks. The pen tool is perfect to go around rough edges. While using this tool make sure that you are leaving out consistent spacing around the edges if you want to get optimum results. Next concert the shape you drew with the pen tool into a selection and then fill the selection by accessing options from the Edit tab. You can then remove the person and then save your changes.
Some basic principles of editing?
The principle is about the amount of editing you are doing on a picture. With the number of effects out there, you might get overwhelmed by what you can do. There are a lot of pretty things that you would feel like applying to your image and eventually get carried away. The more you stick towards the original look the more natural your photo will look. Keep in mind that some photos like portrait images of objects will quickly look its beauty if you apply too many effects on it. Sometimes you much accept the fact that it is these little imperfections that make the image what it is in the first place. Celebrate these imperfections rather than hiding them away. Sometimes it is our insecurities of ourselves or the fact that we need it to look brilliant, that we tend to over-edit our pictures. However, this is not needed. You can always undo changes but once you got that save button all changes are locked in and you will have to start from the beginning.
Going the natural route is one of the beautiful things a photo editor can do. Building from the preview principle this one may feel like it’s totally the opposite of what was said previously, but hold on. While going without editing is good, not all-natural photos will have the right tone when clicked. The sun might be too glaring or the evening too dull. At this point, it’s okay to do a bit of editing to spruce things up a bit. But always remember not to go overboard again. Find the balance and always stay a point below the point where things start becoming unnatural.
Another principle is to always have an excess of image area to work with. When clicking a picture you may tend to focus on one area thinking that the background information is not needed. However, it is better to take a large zoomed out version of the scene and crop it in post editing rather than coming in with a smaller sized picture and wishing you had included more of the background.
Finally, the last principle that we all must hold onto is honesty. When working with images, especially those with other people in it, you must realize that you are working with their digital property. Just like how you would give respect to other people’s things, keep this in mind when editing photos of others or when they are in your picture by mistake. Don’t make any embarrassing changes or do things that will alter the image in a way that will upset anyone. One more detail to remember is to ask the permission of the people involved before publishing any image online.
What is a synonym for the word photo?
Here are some synonyms of photo: pic, shot, image, snap, picture, and snapshot.
How do I learn to edit photos?
The simple answer is to train yourself with a professional. While some amateur photographers would want to take their new passion to the next level, they may also get stagnant at one point of time or the other. The improvement curve from that point will probably reach a plateau resulting in even loss of interest. Use your motivation to layout a fool-proof plan to continuously improve your skills by doing internships (even unpaid) and paying some professionals to let you shadow them during their course of work.
You need to understand both theories and practicalities in order to step up your skill just like any other learning. While theories help you understand why something is done the way it is done, practical lessons will give you experiences that can never be learned in a classroom setup.
Learning Theories – Starting small crash courses on Udemy to full-fledged diploma courses, there are a million options for you to start. You can narrow down the option that you should choose by jotting down your availability, budget, and level of training. I personally have been to a 6-month crash course to train myself in Adobe suite that kick-started my career as a desktop publisher. My goal was to learn the tools to make the most of the application. I wanted a career and had sufficient skills but had a mediocre tool knowledge. The budget was not-deal breaker however I was not ready to invest too much as well. I found an easy solution quite close to the place where I live and it gave me what I wanted. Maybe you could start by asking yourself the aforementioned questions.

Practical lessons – You learn something in order to do something. The knowledge that cannot be put into practice becomes useless. Invariably, everyone who learns theory will end up getting into practical work. While this is obvious, training while learning theories will rule out the fear of not knowing where to start when you actually have something serious to do. You can start by being an apprentice for your favorite photographer or tag along with someone whom you think can add value to your learning. This may open up avenues that the classroom training is incapable of since journeying with an expert will always help you visualize ideas in a more pragmatic way.
There is also another way that can serve people who are keeping this just as a hobby but would like to improve your skills is by learning it on YouTube. YouTube serves as a fantastic tool for many people to learn different things. There are experts who do free videos (not actually, they make a lot of money by posting videos on YouTube) on specific topics that help you get a deep knowledge of the ‘How to’ aspect of the tool. The best part is that many people even make a video based on people’s requests. This means you can passively interact with the tutors and get video or text responses.
You know a coin has two sides. However great YouTube learning can be, it has some limitations. The biggest of them all is that there is a lot of stupid content on YouTube that is unverified and can misguide you. You will be at your wit’s end before you try to find the right guy or girl to teach exactly what you want. Since the tutor is not physically present, asking them a quick question is not possible. And there is no guarantee that you’ll get a response for every comment.
Reasons for editing pictures.
Below are the main reasons why people edit photos:
Giving life to photos – Different cameras capture the same scene with different detailing and this is owing to the capability of the sensor that reproduces the light that enters the lens. Cameras, in general, have limitations in capturing an image in tough scenarios like low light, high dynamic range, etc. Many a time the scene looks more beautiful than what the camera picks up. You can click an image and use exposure blending to improve the quality of the image. To do some justice to the actual scene, color and contrast ranges can be adjusted just to bring it closer to reality.
Display worthy – If you are a professional photographer trying to make enough money for living, you would’ve understood that there is a balance that you have to strike between pursuing your passion and meeting customer demands. Different customers demand different things, some of which you may even consider to be ridiculous. However, giving people what they want will help you get and keep clients who can give you business. Some photos that people like to hang on their walls may need extra details than what you can capture using your camera. Post-processing can sometimes be the only solution as this art goes where your imagination takes you to.
Tell them a story – Photo editing empowers the artist to combine a couple of images to tell the viewers a story. This is absolutely impossible with just a camera. A recent trend in Instagram is to convey stories to the viewer through collages. I have come across a couple of photographers who compare the happy part of the world with the sad part of the world trying to convey a message that would spark an emotion in the viewer.
Should photos be edited?
Let me put the answer to you simply. Yes, photos should be edited. Most people walk around not knowing the importance of editing pictures. This is because almost all of us have unlimited storage on our devices and we go crazy clicking pictures. We end up with a truckload of pictures, say after a trip or after a family get together, that by the time we are done with the picture taking we don’t bother to edit them as we have just too many photos to go through and edit.
But think about something as simple as street photography. It is much better to see the colors in the image pop rather than a dull piece of scenery. The problem is not if photos should be edited, the problem is should we even be taking so many photos. If we were given the rule to follow that we should only take one picture of one scene, we would probably spend more time in making that one image look good to be it while we click the photo or while we edit it.
How do you think our older generation survived with their film canisters and polaroid camera? Do you think everything went about hoarding film and clicking a hundred versions of the same scene? Definitely not! They picked out what was best abs snapped shots of only those things. Unfortunately, they weren’t able to edit anything back in those days. But now you can.
What do photographers edit pictures?

There are many different applications that professional photographers can choose from which can either be free options or paid options.
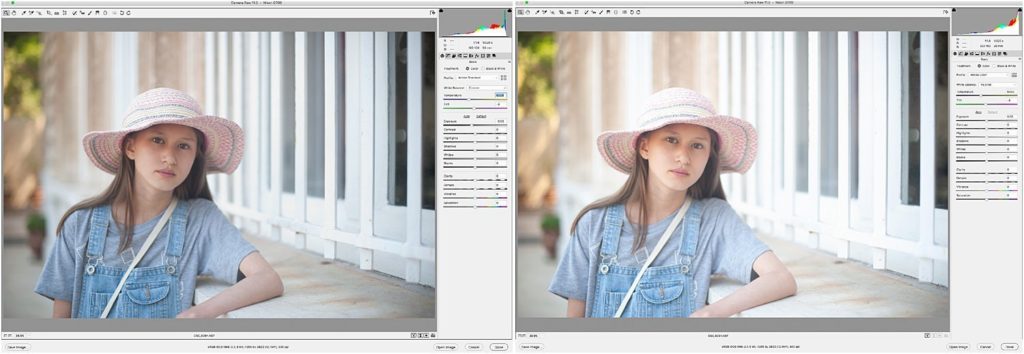
Adobe Lightroom – Abode gives you a complex tool for all your editing needs and it is Adobe Lightroom. With this application, you can edit your pictures with the help of a host of a different set of features. This is also done on an intuitive surface that is user-friendly to use. Some of the things it has are the ability to detect people’s faces which can help you in organizing your photos better, fixes for camera and lens errors, different brushes and gradients, corrections tools like the blurring tool, filters that are preset, and finally high customizability across various devices for ease of access.
Skylum Luminar – This application has recently become one of the widely used tools by many professional photographers. One of the main selling points for this app is that you only have to pay an initial fee and have the software all to yourself. Luminar includes plenty of features and can also be used as a plugin with our previously discussed application – Adobe Lightroom and Apple Photos as well. The captivating features this tool has is its AI slider which is an overall corrector of the granular adjustments that must be done to your image. The application also includes incredible filters such as those that as the rays that come out from the Sun and a lighting filter to mimic a rainy atmosphere.
Adobe Photoshop – Adobe Photoshop is considered to be one of the best photo editing software out there. This software contains many tools such as those for masking to create different effects, retouching to correct an image, and layering to work with a certain portion of the image. As this is a well-rounded tool this is best used when you have extensive projects to work with not your every edit. Photoshop also includes 3D design functionality for those extensive pictures.
Capture One – This tool is a RAW image editor. It comes from the grip called Phase One. With this application, you can enjoy features such as interface customizability wherein you can modify the program’s feel to your whatever you please including configuring and maintaining keyboard shortcuts for easy access to tools. You can also work with layers without the lag that most applications have. You can edit the colors in your image with good flexibility that allows you to edit at a granular level. This tool is also great when collaborating with a team. And when you are a professional working with your team it is easy to make notes so that others can also follow up.
Corel PaintShop Pro – Edit your images without a fuss but do it very effectively with the Corel PaintShop pro application. On the outside, this tool may not look like much but it can provide you with everything you need to take your images up a notch without burning a hole in your pocket. The batch of features it comes with is a set of enhancement presets that you can apply to your images. It also includes a couple of templates for designing and how-to tutorials which can help you get going with your work.
ACDSee Photo Studio Ultimate – This is a fairly new application that has entered the market. The ACDSee Photo Studio Ultimate is an all-in-one photography software with you can do almost anything. With its simple style and brilliant features such as editing directly from your system without having to import images into the application and using facial recognition to index your photos; this app has got it all.
Gimp – This is editing software that is free to get and simple to install on your device. You can start off with the retouching feature that this app provides and move on to the photo composition and picture enhancement features that add that zing to your photographs. Another cool thing that this application comes with is its an in-built repository where you can store your files. Other features this app includes is the ability to use clone and touch-up tools and support of multiple plug-ins.
Canva – The Canva tool is a simple application that can be easily installed on your mobile phone. The good thing about having this app on your movie is that you can easily click pictures and edit them instantly. You don’t need to wait to get back to your computer to start the editing process. This tool includes many templates, photo cards, and icons that make your photographs visually appealing. You can especially make use of such images in an advertisement or on your website. The Canva app also allows you to work with your images by including necessary font and other elements that you need to add images to your website or blog. Basic effects such as blurring and vintage looks, crop and alignment, and the transparent effect are also available on this application.
Pixlr Editor – This app can be installed on your desktop and on your mobile phone. With this application, you can start your editing process by applying instant filters and custom effects and overlays.
Snappa – Use this app to add new dimensions to your images without much trouble. It comes with stock photos that you can pick from and also other graphics and text to add to your image.
PortraitPro – This is definitely a professional image editor as it helps photographs, specifically those who are interested in taking portrait images. You can use skin tone correction, blemish remover, and wrinkle-reducing effects. Enhance your subject’s features by also adding makeup if needed.
Fotor – This application is cloud-based and has a wide user base. The application itself is free and can be installed on your desktop or accessed online. Because this application can be accessed on the cloud to can save your half done images online and access it from any device. This is great for photographers who are on the go. It includes HDR effects, filters, retouching, fonts, shapes, and templates.
Inkscape – This application is also free and can be downloaded on your Mac and Windows system. You can clone objects, change up the colors in your images or place text over your image if needed.
Serif Affinity Photo – Serif Affinity Photo is a vector-based designer for images which is also one of the applications that can be used.
Different way to remove text from a picture?
Photoshop – With Photoshop you can remove text from a photo in multiple ways. If your photo can be opened as a Photoshop file, you can access the text as a separate layer. All you have to do is simply remove the layer with the text and it’ll be like it was never there. You can also use the eye icon in the Layers tab to hide the text layer and export the photo as another file without the text. Another way to do this is to use the healing tool. This is a brush that is primarily used for blemishes on the face but can be used for this purpose as well. Just use the brush over the text area and you will see the text slowly vanish and be replaced with the picture that was underneath it. If your text is on a solid picture with bold patterns you can use the spot healing brush tool to replicate the pixels near it and thus remove the text. Prior to beginning your work press the ALT key and then continue moving the brush across the canvas and clicking over the areas you want to remove. You can also use the Patch tool in a similar manner. To do this you must make a selection of the text and move the text to a similar area. You can see the changes happen in real-time so this is very useful for you. Another useful tool is the Clone Stamp tool. With this tool you can copy an area and use it as a graphic sample which you will then be placed over the text, eventually hiding it.
Apowersoft Watermark Remover – This is a desktop program that can be used on a Windows operating system. This app can not only be used to remove objects from images but also from videos which is always a nice tip for professional photographers. When you have your image imported and ready, click the Image Watermarks option and then bring in your images in the software. This app has three tools that can be used for selection. You can pick from any one of these and highlight the unwanted text that you want to delete from the image. After you are done, click the Convert option to save our changes on your local system.
WebinPaint – This is an application that can be accessed online on the web. You can not only instantly remove text from your photo, but you can also remove watermarks, logos, and other objects as well. First, select the image you want to change and click the red button which you can use to highlight the text. Check if the text has been highlighted correctly and click the Erase option. This will give you an image that you can download onto your computer.
Gimp – This is another tool that has a couple of options with which you can remove the text that you do not need from an image. First up is the Magic Wand tool. To use it you must open the image in Gimp. Next, you must select the layer and then select the Transparency option and then click Add Alpha Channel. Next, you should set the mode to Add to the current selection from the Toolbox palette when you select the Magic Wand tool in order to use it. Finally, click on the area where you find the text to remove it and then when you are done selection, press Delete. The next method is to use the Color to Alpha option. One of the limitations this option has is that it works well with an image that has a simple background. To use this option right-click on the layer after your image is opened in Gimp and add an Alpha channel like how you did previously. Next, choose the image option then choose the Colors option and then the Color to Alpha option. Select the color you want to remove and click the OK option after that. Do these steps again until the needed area is hidden. Another option is to use the Foreground Select tool. Once you select the tool roughly mark out the area around the foreground and repeat it until you have selected all of the areas. Finally, press the ENTER key and then invert the image use the image option and then clicking the select option and finally the invert option. In the end, you can press Delete to complete the task. The final option is to use the Resynthesizer plugin option which must be installed by you. Click the Filter option and then click the Enhance option followed by the Heal Selection option.
How do I edit the text in a screenshot?
We had discussed enough photo editing apps for mobile phones in my previous blogs. While those are pretty good with editing an image to perfection, not all apps are capable of this high-end feature.
PhotoDirector – The best application that I think can handle this job with perfection is the PhotoDirector. This can mimic the clone tool that is available in the desktop version of Adobe Photoshop. Follow the below steps to edit texts or remove objects using this app.
Start by opening the desired image in the PhotoDirector edit window. At the bottom, you will be able to find the Remove/Clone option, click on it and select remove in the sub-menu. Once selected, the brush tool will let you paint over the areas that you would like to remove, in our case, a text. Your selection is indicated by a translucent red paint and upon clicking ‘apply’ the app intelligently fills the marked area keeping what is available near it as it’s the source.
Once the text is removed from the original screenshot, use the text tool to enter what you need and save it in your gallery.
Picsart – Another powerful and versatile tool that I prefer is Picsart. I’ve been using this app on my mobile phone for more than 5 years now and I absolutely love what you can do with just this app. Well in our case, the clone tool in Picsart’s tools option can be used to remove the text from a screenshot.
Open the image in the Picsart edit window and select the tools option in the pallet below (or in the side if you have kept your phone in landscape orientation). From the menu that pops up, select the clone tool. This clone tool works very similar to the one available in Photoshop. Start by selecting the clone area using the selection brush and slowly scrub over the text area to make an overlay. You may choose to zoom in and precisely brush the tight spots so you don’t make it obvious. Now select the text tool and write what you want on the image.
Depending on your mobile phone’s screen size, cloning intricate backgrounds, if not impossible, can be very challenging.
What do you mean by Photo Editing?
The manual method is sometimes very difficult to do and that is where applications like Photoshop and Lightroom come into the picture. They help ease these processes of editing by giving you preset tools that apply effects directly to your image. Many of our photos are enhanced with the help of these tools and a click of a button. Sometimes photos are edited to fix the mistakes that were made when clicking the photo or to make memes that spread virally online.