
Before learning how to improve your editing skills, you can know the image workflow. You need to separate the originals in a safe place. To prevent you from damaging the original photo. You also need to know the photo editors. Its features and shortcuts. Don’t neglect the Save As a function, that allows saving a copy without modifying the original.
Crop
It is an important tool. You can remove a part of an image. The user shapes a rectangle around the area he wants to keep, and the rest is removed. Rotate and straighten tools are related to the featured crop. Straighten allows you to specify the reference point or the horizon line. Rotate allows you to rotate an image. It is wise to rotate first and then crop. You will have the proper orientation.
Brightness and contrast
You can increase or decrease the relation between the darks and bright. It is possible to increase r decrease the image brightness. Combinations of contrast and brightness have a great impact on your photo. The combination can soften the visual impact or make it stronger. Brightness can emphasis on sunsets or other spectacular shots. You need to try this tool when your photo looks dull or flat.
Saturation
You can use this tool to increase photo color. Don’t use it in excess, the image will be artificial and skin tones unnatural. It works perfectly for floral or outdoor images. Saturation helps to sweeten the impact of a photo.
Resize
The tool is used to change the number of pixels, the size of an image. If you need to send an image to a website, you need to reduce the size but never resize an image beyond the original dimensions. It avoids not to take too long to load. If you need to print an image, you may want to make it larger. The interpolation delivers mixed results when you try to increase the photo size beyond the original dimensions. Combined with Crop, it is a tool to prepare a photo to be published or printed.
Color Temperature/Color Adjust
This tool adjusts the photo’s color temperature. If the camera isn’t matched up to the color temperature of the light source. The resulting photo can have an undesirable color cast. Using Color Temperature/Color Adjust, you can choose a natural color (gray or white) in the photo and let the feature shift the color to match. You also can tweak some settings to make the image warmer or cooler. You can make it right in the camera. The tool helps you to save photos if there are improper colors.
Curves and Levels
There are more sophisticated tools than Brightness and Contrast tools. Levels allow to mid, black, or white points of a photo and change the image accordingly. You can push the lightness to mid-tones, the darks darker and the whites whiter. It is useful to repair skin tones while keeping the bright elements unchanged. Curves are flexible when you need to make a sophisticated transformation of the original photo. The tools can be used in excess if you want a surreal appearance.
Clone/Rubber Stamp.
The tool lets you remove objects from the image or retouch the image. With practice, you can edit background objects or braces. There are a few related tools, such as Object remover or Scratch remover.
You can find these features on almost photo editor. We only intended to let you know in a few phrases how efficient they work
A simple household mirror can create stunning photos when it used creatively. I studied the photographer Gavin Hoey’s tutorials to find out how to use a mirror. We have the chance to create great reflection portraits.
Prepare the mirror
You can use a regular household mirror. It is necessary to remove the frame first. Try to use the bigger mirror in your house. Check the edges of the mirror must be checked first. Make sure it doesn’t have any roughness. You already know that mirrors attract smudges and fingerprints. Purchase a cleaning spray and a clean towel.
If the mirror is rectangular, you have two options: long or wide. If you decide to use the wide orientation, you will have more reflection toward the frame sides. If you need more reflection toward the camera, you need to rotate the mirror and use the long side. You can choose the most appropriate version, depending on the photo complexity.
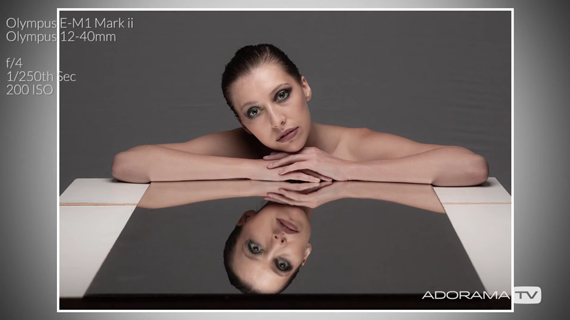
Background and lighting
Professional photographers use a simple white background. Here is detailed article for 10 best tools for editors for photographers. The leading light mustn’t be turned to the environment. It is the reason why the background often appears gray. Photographers usually place an eVOLV 200 behind the subject. The procedure illuminates the background. You can use a simple method. In a small studio, you can set the light close to the background. The background is white in the center. It is gray on the sides. The solution is to place two eVOLV 200 lights behind the model. The lights must be behind the model, pointed toward the background. The method gives a crisp background; it is uniformly colored. The image can have a unique look with a small replacement of the lights. If the lights are at the model’s back, the result is a more intense photo.
Post-processing
When you use mirrors, you can see weird reflections or shadows. You can solve the problem using the Heal brush in Photoshop. You need to be sure to sample from an area close where are issues. You will obtain great results. The other problem is the quality of reflections. We know, the mirrors have a glass layer on the top. There is another layer at the bottom. It is in silver. You will have two separate reflections. The image will neither be blurry neither sharp. To make the reflection blurry, go to Filter -> Tilt-Shift. You will see four lines. Now you need to drag the second line above the model. Then align the third line where the model body meets the mirror. Drag the fourth line toward the reflection.
If you have a mirror around your house or your studio? Use it and get creative.
Photo credit: Sam Clover, Lee Morris, Gavin Hoey